最近买了两条 P44 Pro,给三台设备换了硬盘,同时系统也要跟着换,情况如下:
- 一条 P44 Pro 插在台式机,需要把装在三丧 980 上的系统迁到新固态,换下的 980 准备给 NAS 用做系统盘
- 一条 P44 Pro 插工作笔记本,把狗屎 Intel 660P 上的系统迁到新固态上
- NAS 的系统(OpenMediaVault)装在金士顿的一块廉价 SATA 固态上,准备迁到 980
总之是要克隆三个系统:两个 Windows 11,一个 Debian 11。
最终选定的解决方案是傲梅轻松备份和 Clonezilla 再生龙。
Windows
迁移
我使用的是傲梅轻松备份,使用非常简单,不用做启动盘、不用重启进入 PE,可以直接在当前系统运行的状态下克隆系统。

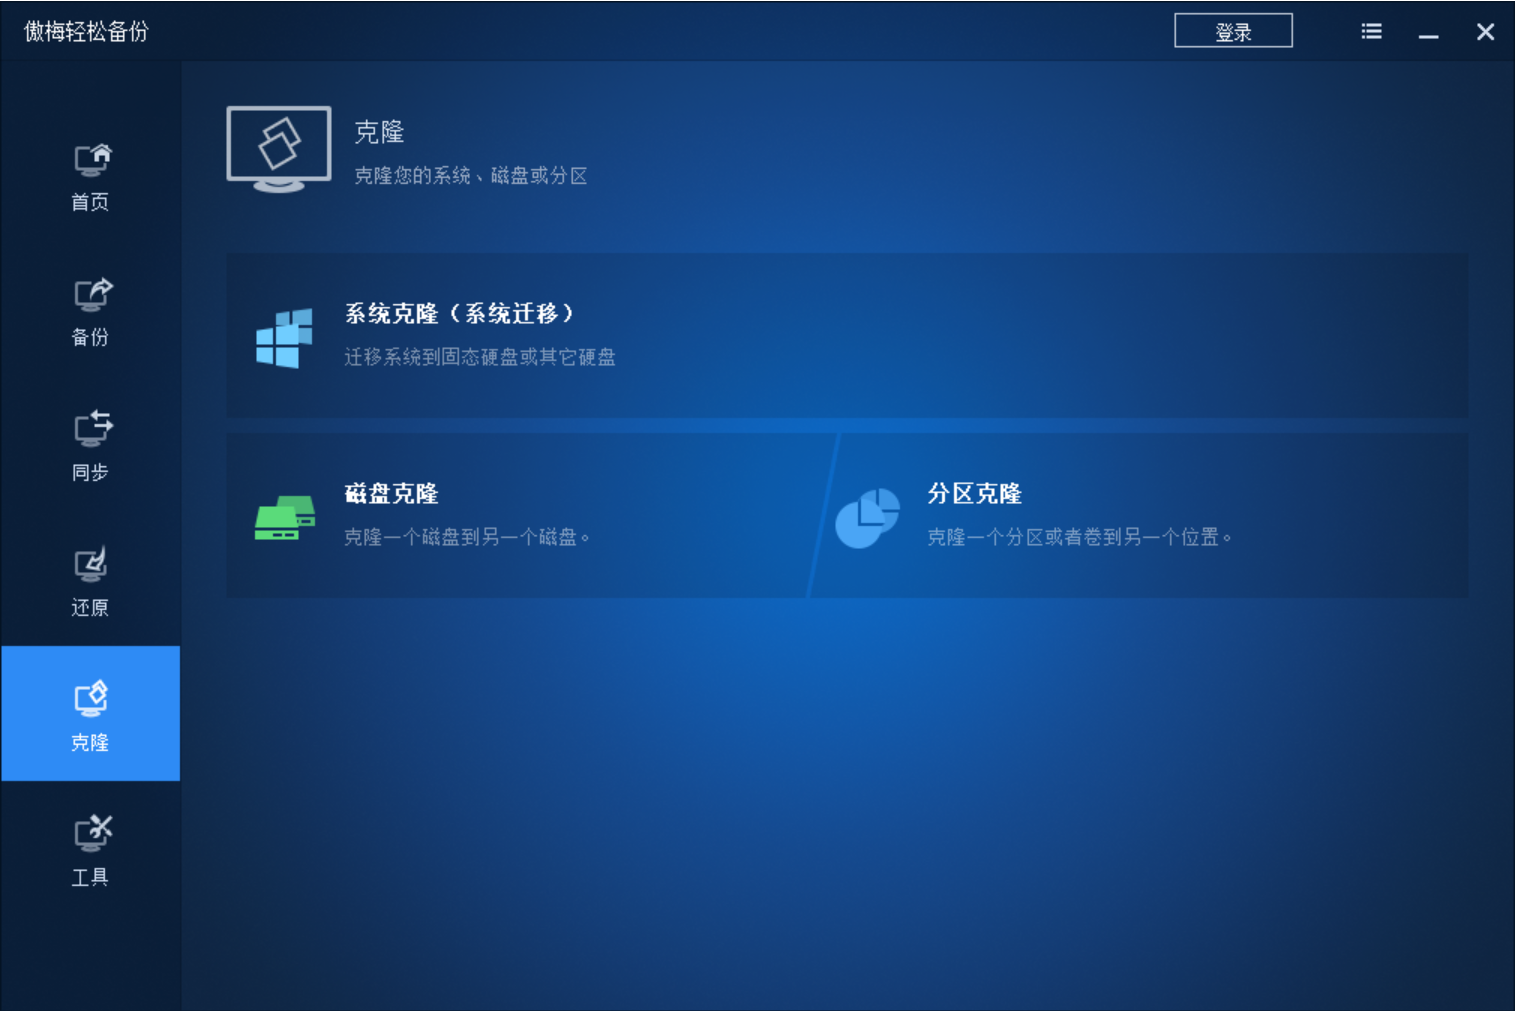
安装并打开软件后,点击克隆 - 系统克隆(系统迁移),按引导进行操作。
唯二需要注意的是:
- 新盘的数据会被擦除
- 新盘空间要大于或等于旧盘。
迁移后问题处理
启动到新的系统后,可能会有些在线账号权限或应用权限问题。以我出现的问题为例,可以进行如下检查:
-
打开设置 - 账户,检查 Microsoft 账户是否正常,一般有问题会弹出提示,按提示输入账号密码重新登陆微软账户就好
-
所有 UWP 应用都无法启动,出现“离线或不在磁盘上”之类的错误,我是这么处理的:
-
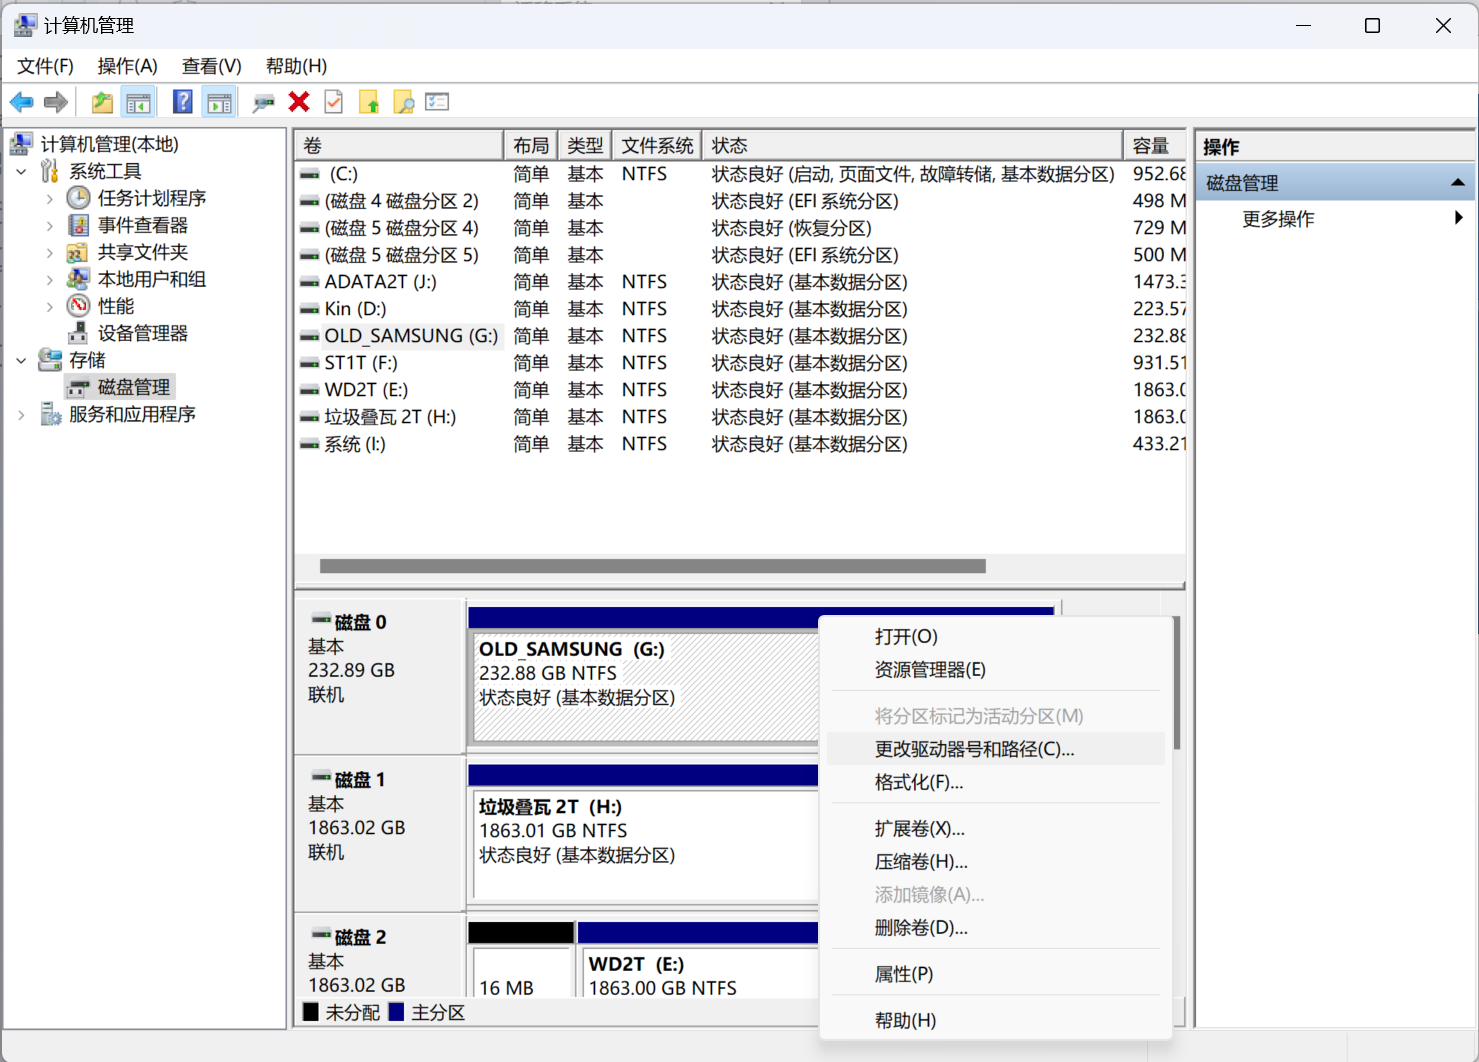
检查新系统的盘符是否紊乱,如果盘符和旧系统不一致,在计算机管理 - 磁盘管理中,右键目标磁盘 - 更改驱动器号和路径,将盘符恢复为旧系统的即可:

-
使用管理员权限运行 Powershell,键入以下两行命令:
$manifest = (Get-AppxPackage Microsoft.WindowsStore).InstallLocation + '\AppxManifest.xml' ; Add-AppxPackage -DisableDevelopmentMode -Register $manifest Get-AppXPackage -AllUsers |Where-Object {$_.InstallLocation -like "*SystemApps*"} -
重启
-
Linux
迁移
使用再生龙(Clonezilla)进行系统克隆,直接下载最新稳定版:
-
Clonezilla - Browse /clonezilla_live_stable at SourceForge.net
-
上面的下载慢可以从 OSDN 下载:Download File List - Clonezilla - OSDN
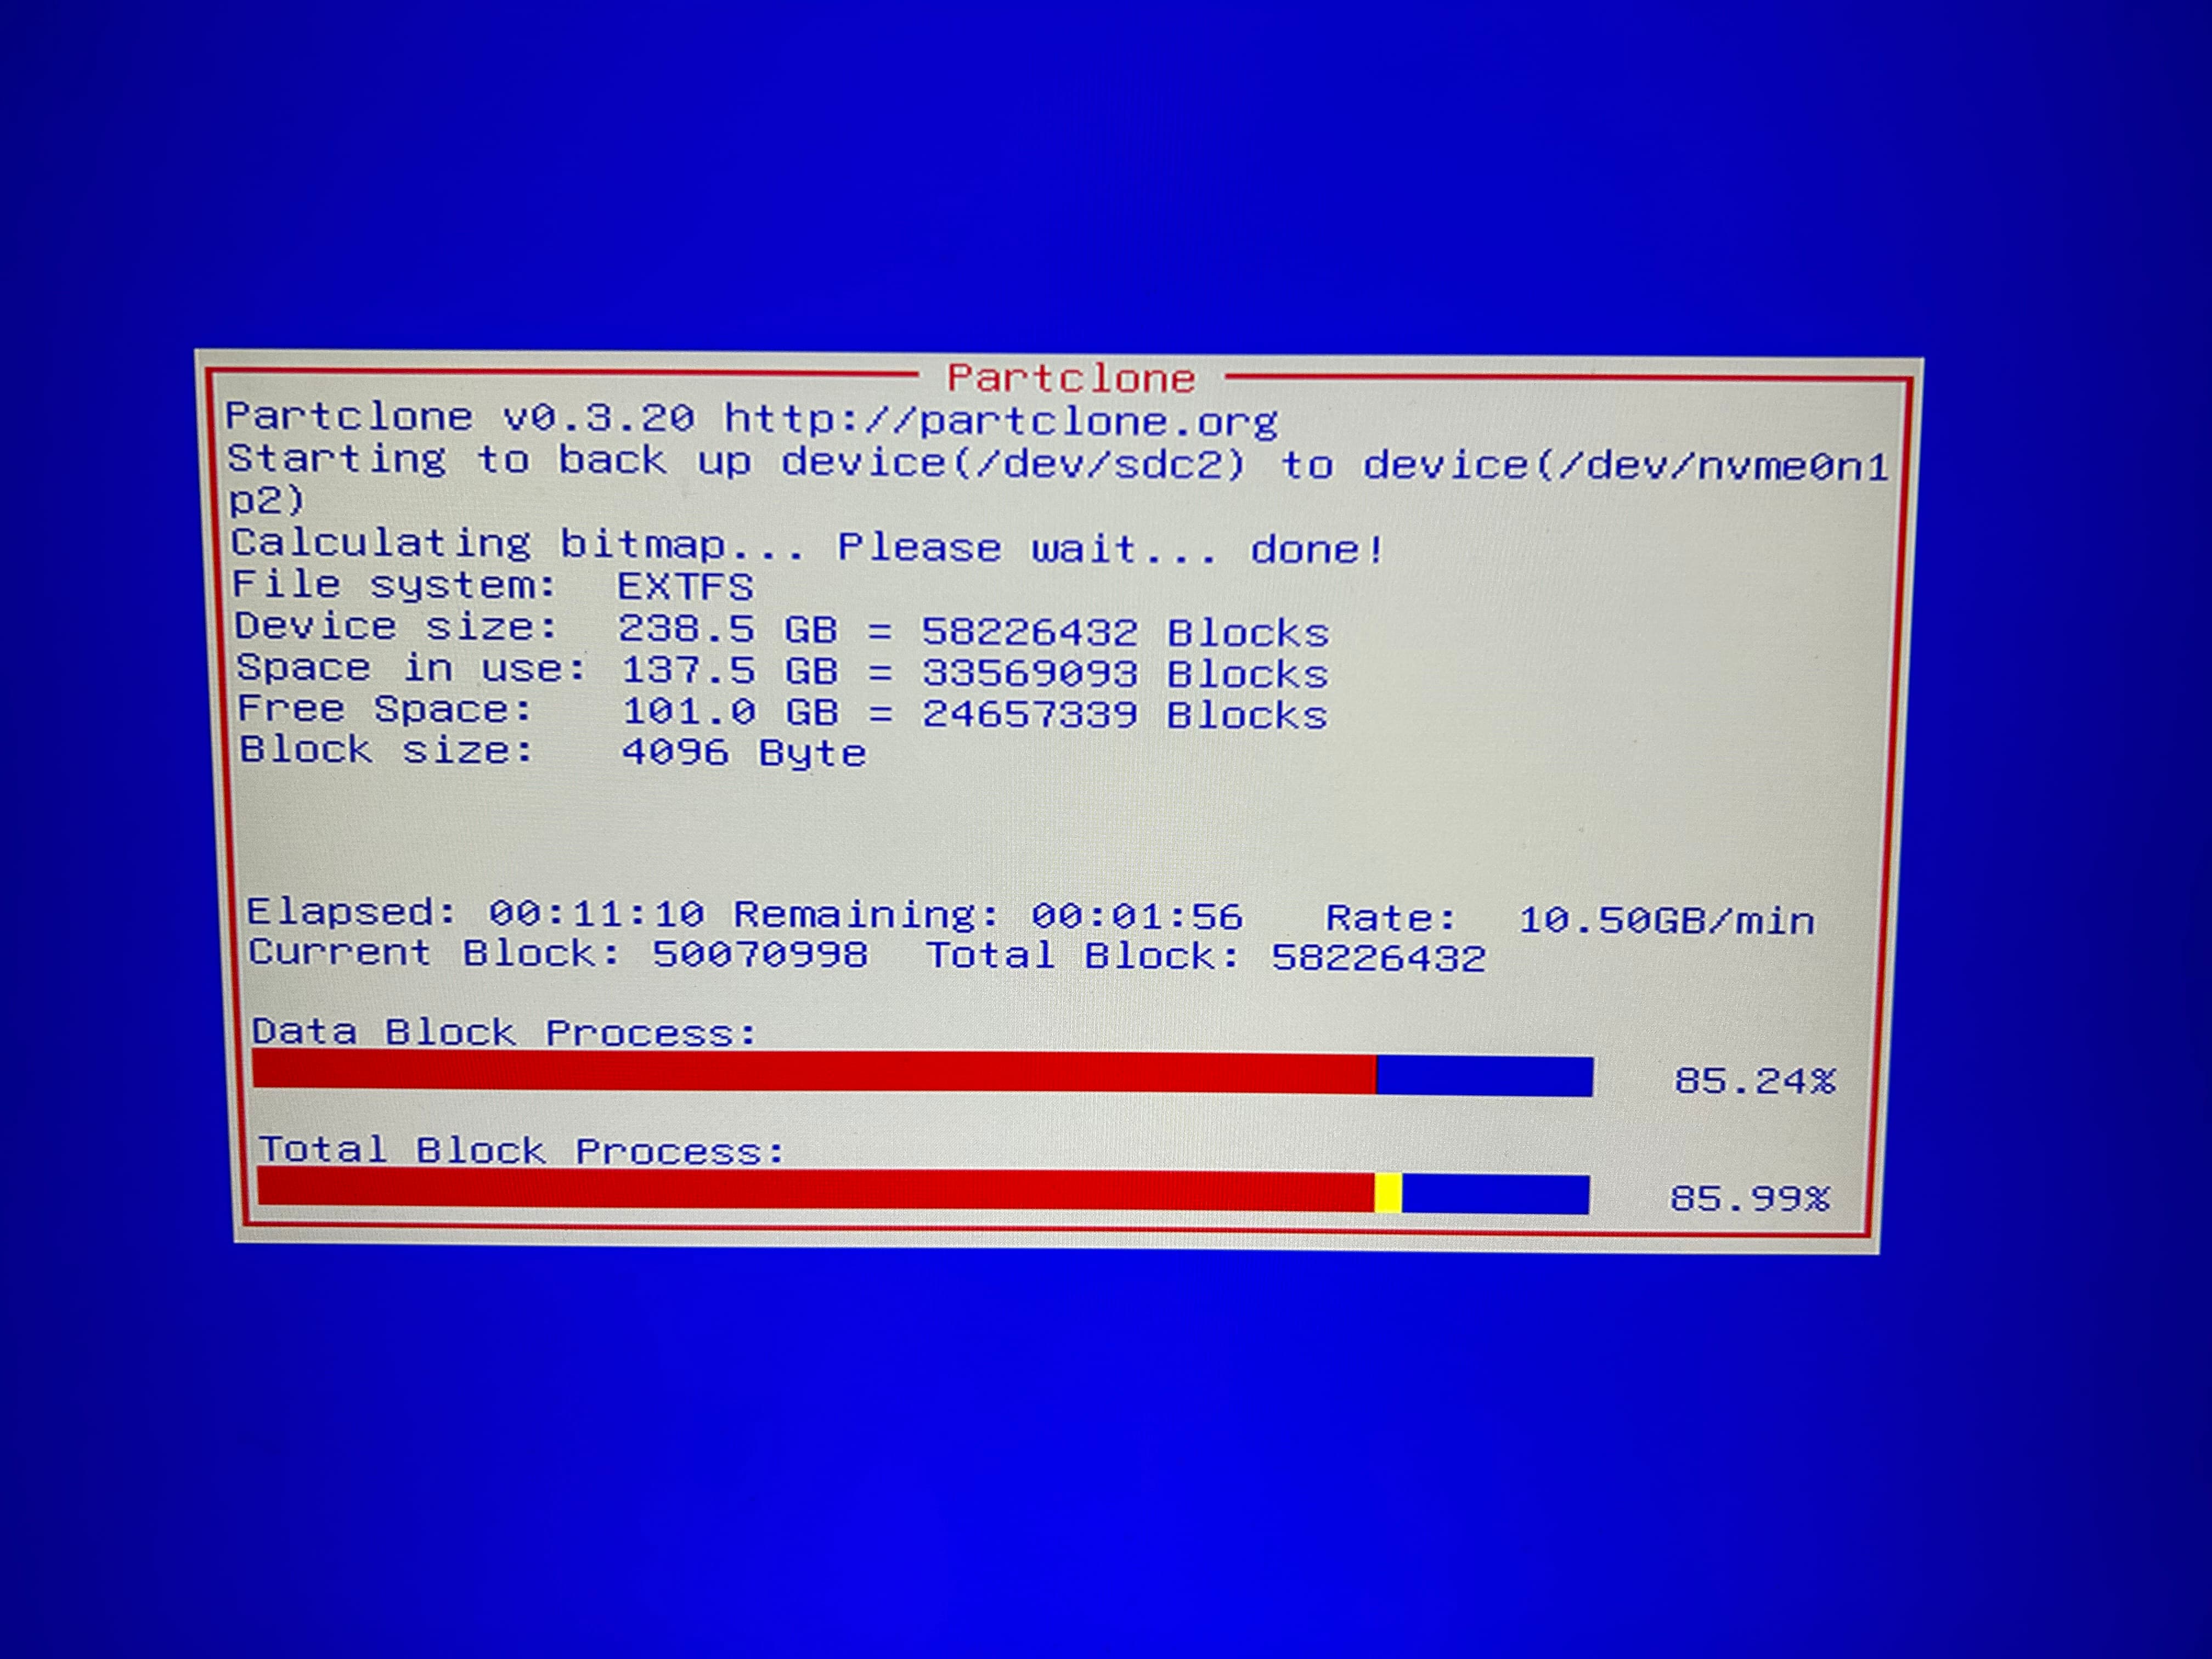
下载并用 Rufus 等工具录好 Live CD 启动后,跟随程序引导,十几分钟就能搞定系统迁移工作,而且不用操心引导修复之类的问题,真心好用。

最后,如果是同一机器系统克隆,在迁移完后,记得关机、拆掉原来的系统盘,然后再开机。不然按官方所说,可能会造成一些非预期的问题。
迁移后问题处理(扩容)
因为赶时间又不熟悉再生龙,所以一路选的默认配置:

最终效果是硬盘对拷 + 引导自动修复,有 200G+ 空间未分配,造成了浪费。我猜再生龙配置途中应该要选一个类似于“按扇区倍数放大”的选项,才能直接利用所有空间(风险未知,博主未验证)。
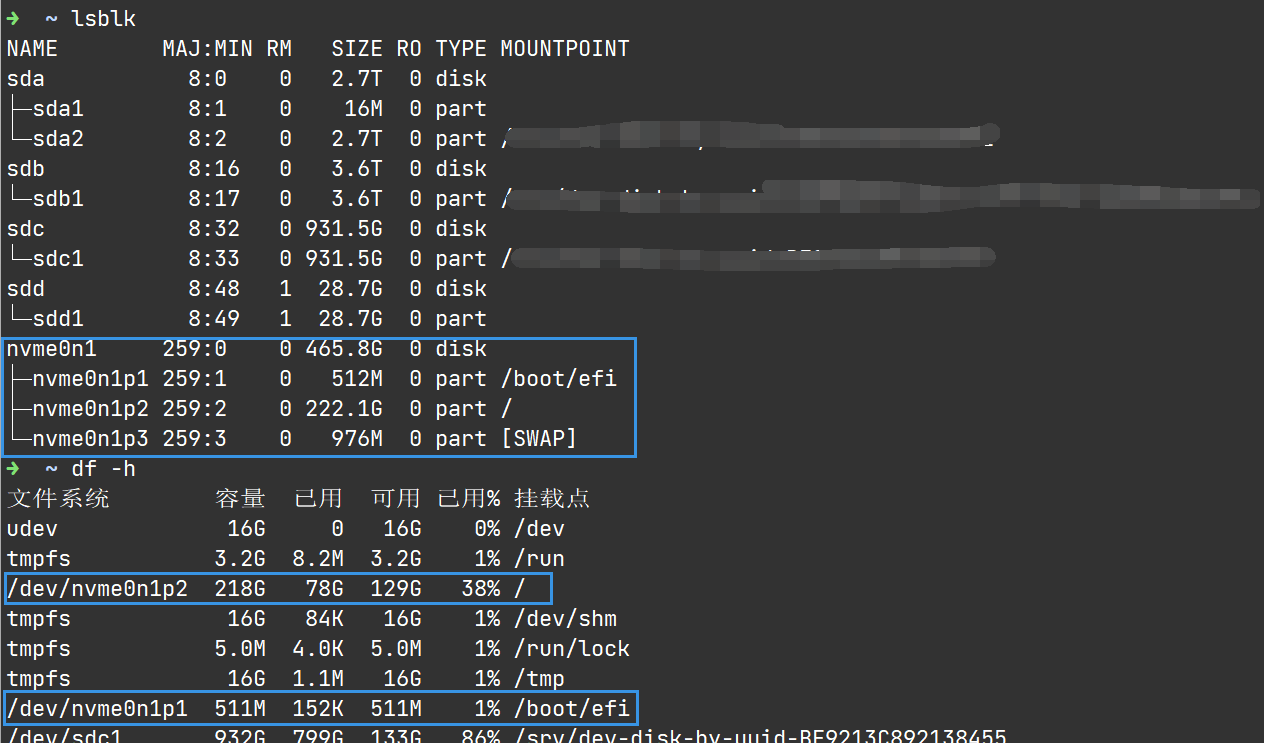
克隆后系统盘的状况如下(这码打了跟没打一样):

此种浪费当然是不能容忍的,于是准备把 /dev/nvme0n1 上未利用的 200G 分配到 / 去。
可以看到 nvme01n1p3 作为 swap 在扇区末尾,比较简单粗暴的扩容方式是直接删去交换区,扩容 ovme01n1p2,随后再手动添加 swap。博主也正是使用此方式进行的扩容。
删除 Swap
关闭系统 swap:
swapoff --all
编辑 fatab 配置,注释 swap 部分:
vim /etc/fstab
# 注释部分:
# swap was on /dev/sdb3 during installation
#UUID=764d78f5-c416-46db-985f-69808aefcdf8 none            swap    sw              0       0
另外再编辑 initramfs 的 resume 文件,注释掉 swap 的 UUID,并添加新行(不明觉厉):
vim /etc/initramfs-tools/conf.d/resume

# 内容:
#RESUME=UUID=764d78f5-c416-46db-985f-69808aefcdf8
RESUME=none
更新 initramfs:
update-initramfs -u

# 输出:
update-initramfs: Generating /boot/initrd.img-6.0.0-0.deb11.6-amd64
启动 fdisk,删除 swap 分区:
- p - 显示分区
- d - 删除分区
- n - 添加分区
- w - 保存设置
fdisk /dev/nvme0n1

Welcome to fdisk (util-linux 2.36.1).
Changes will remain in memory only, until you decide to write them.
Be careful before using the write command.


Command (m for help): p
Disk /dev/nvme0n1: 465.76 GiB, 500107862016 bytes, 976773168 sectors
Disk model: Samsung SSD 980 500GB
Units: sectors of 1 * 512 = 512 bytes
Sector size (logical/physical): 512 bytes / 512 bytes
I/O size (minimum/optimal): 16384 bytes / 131072 bytes
Disklabel type: gpt
Disk identifier: 4F5E1E90-9B68-4492-8080-9FB7EB89CAFF

Device             Start       End   Sectors   Size Type
/dev/nvme0n1p1      2048   1050623   1048576   512M EFI System
/dev/nvme0n1p2   1050624 466862079 465811456 222.1G Linux filesystem
/dev/nvme0n1p3 466862080 468860927   1998848   976M Linux swap

Command (m for help): d
Partition number (1-3, default 3): 3

Partition 3 has been deleted.

Command (m for help): p
Disk /dev/nvme0n1: 465.76 GiB, 500107862016 bytes, 976773168 sectors
Disk model: Samsung SSD 980 500GB
Units: sectors of 1 * 512 = 512 bytes
Sector size (logical/physical): 512 bytes / 512 bytes
I/O size (minimum/optimal): 16384 bytes / 131072 bytes
Disklabel type: gpt
Disk identifier: 4F5E1E90-9B68-4492-8080-9FB7EB89CAFF

Device           Start       End   Sectors   Size Type
/dev/nvme0n1p1    2048   1050623   1048576   512M EFI System
/dev/nvme0n1p2 1050624 466862079 465811456 222.1G Linux filesystem

Command (m for help): w
The partition table has been altered.
Syncing disks.
扩容
运行 fdisk,编辑 / 对应分区的扇区记录,直接把所有后续扇区划给 nvme0n1p2。
这里有几个操作需要注意:
d删除分区后,千万不要手贱立即w保存n新建分区后,可能会提示我们存在ext4 signature,根据这个解答:linux - What is a vfat signature? - Unix & Linux Stack Exchange,我输入的是N
fdisk /dev/nvme0n1

Command (m for help): p
Disk /dev/nvme0n1: 465.76 GiB, 500107862016 bytes, 976773168 sectors
Disk model: Samsung SSD 980 500GB
Units: sectors of 1 * 512 = 512 bytes
Sector size (logical/physical): 512 bytes / 512 bytes
I/O size (minimum/optimal): 16384 bytes / 131072 bytes
Disklabel type: gpt
Disk identifier: 4F5E1E90-9B68-4492-8080-9FB7EB89CAFF

Device           Start       End   Sectors   Size Type
/dev/nvme0n1p1    2048   1050623   1048576   512M EFI System
/dev/nvme0n1p2 1050624 466862079 465811456 222.1G Linux filesystem


Command (m for help): d
Partition number (1,2, default 2): 2

Partition 2 has been deleted.

Command (m for help): n
Partition number (2-128, default 2):
First sector (1050624-976773134, default 1050624):
Last sector, +/-sectors or +/-size{K,M,G,T,P} (1050624-976773134, default 976773134):

Created a new partition 2 of type 'Linux filesystem' and of size 465.3 GiB.
Partition #2 contains a ext4 signature.

Do you want to remove the signature? [Y]es/[N]o: N

Command (m for help): p

Disk /dev/nvme0n1: 465.76 GiB, 500107862016 bytes, 976773168 sectors
Disk model: Samsung SSD 980 500GB
Units: sectors of 1 * 512 = 512 bytes
Sector size (logical/physical): 512 bytes / 512 bytes
I/O size (minimum/optimal): 16384 bytes / 131072 bytes
Disklabel type: gpt
Disk identifier: 4F5E1E90-9B68-4492-8080-9FB7EB89CAFF

Device           Start       End   Sectors   Size Type
/dev/nvme0n1p1    2048   1050623   1048576   512M EFI System
/dev/nvme0n1p2 1050624 976773134 975722511 465.3G Linux filesystem

Command (m for help): w
The partition table has been altered.
Syncing disks.
应用分区变化:
partprobe /dev/nvme0n1
扩容:
resize2fs /dev/nvme0n1p2

# 输出:
resize2fs 1.46.5 (30-Dec-2021)
Filesystem at /dev/nvme0n1p2 is mounted on /; on-line resizing required
old_desc_blocks = 28, new_desc_blocks = 59
The filesystem on /dev/nvme0n1p2 is now 121965313 (4k) blocks long.
检查容量:
df -TH

# 输出:
文件系统       类型      容量  已用  可用 已用% 挂载点
udev           devtmpfs   17G     0   17G    0% /dev
tmpfs          tmpfs     3.4G  8.6M  3.4G    1% /run
/dev/nvme0n1p2 ext4      491G   84G  385G   18% /
tmpfs          tmpfs      17G   87k   17G    1% /dev/shm
tmpfs          tmpfs     5.3M  4.1k  5.3M    1% /run/lock
tmpfs          tmpfs      17G  1.1M   17G    1% /tmp
/dev/nvme0n1p1 vfat      536M  156k  536M    1% /boot/efi
...
扩容完毕。
重新添加 swap
OMV 自动设置的 swap 大小是 1G,我根据 RHEL7 的文档,决定稍微增加 swap 大小(4GB)。
不准备再创建分区了,偷懒用 swap 文件进行替代(虽然 RHEL 更推荐分区)。
步骤如下:
➜ dd if=/dev/zero of=/swapfile bs=1G count=4
记录了4+0 的读入
记录了4+0 的写出
4294967296字节(4.3 GB,4.0 GiB)已复制,2.25421 s,1.9 GB/s


➜ ls -alh /swapfile
-rw-r--r-- 1 root users 4.0G  2月  3 14:09 /swapfile


➜ mkswap /swapfile
mkswap: /swapfile: insecure permissions 0644, 0600 suggested.
Setting up swapspace version 1, size = 4 GiB (4294963200 bytes)
no label, UUID=809ad6c4-90bf-4dcc-9e62-7f3655b05491


➜ chmod 0600 /swapfile


➜ vim /etc/fstab
# 添加以下行:
/swapfile          swap            swap    defaults        0 0

➜ systemctl daemon-reload


➜ swapon /swapfile


➜ cat /proc/swaps
Filename				Type		Size		Used		Priority
/swapfile                               file		4194300		0		-2


➜ free -h
               total        used        free      shared  buff/cache   available
内存:       31Gi       5.7Gi        15Gi        51Mi       9.8Gi        25Gi
交换:      4.0Gi          0B       4.0Gi
重启,随后使用这几个命令简单检查一下运行情况:
free -h
cat /proc/swaps
df -h
lsblk
fdisk /dev/nvme0n1
Ref.
- 无法打开 State of Decay - Microsoft Community
- Linux 扩容 / 根分区(LVM+非LVM) - 知乎 (zhihu.com)
- filesystems - Changing a partition with fdisk shows a warning like "partition#x contains ext4-signature" - Stack Overflow
- linux - What is a vfat signature? - Unix & Linux Stack Exchange
- linux - How to safely turn off swap permanently and reclaim the space? (on Debian Jessie) - Unix & Linux Stack Exchange
- Chapter 15. Swap Space Red Hat Enterprise Linux 7 | Red Hat Customer Portal