我很久前就开始使用 WSL 2,遗憾好几次被 pre_release 通道各种鬼畜的 bug 劝退。而这次不同——还算能用的慢速预览通道总算迎来了 2004 更新,这个版本的更新包含 WSL 2。
安装
如果之前已装 WSL
-
在控制面板 - 程序和功能 - 启用或关闭 Windows 功能里开启“虚拟机平台”并重启。
-
到这个页面下载并安装 WSL 2 Linux Kernel:Updating the WSL 2 Linux kernel | Microsoft Docs。
-
将原来安装的发行版转为 WSL 2:
wsl --set-version Ubuntu 2
上述命令的 Ubuntu 换成自己发行版的名字,不确定的话可以通过 wsl -l -v 命令查看。
如果以前没装过 WSL
-
在
控制面板 - 程序和功能 - 启用或关闭 Windows 功能里启用"适用于 Linux 的 Windows 子系统"和“虚拟机平台”并重启。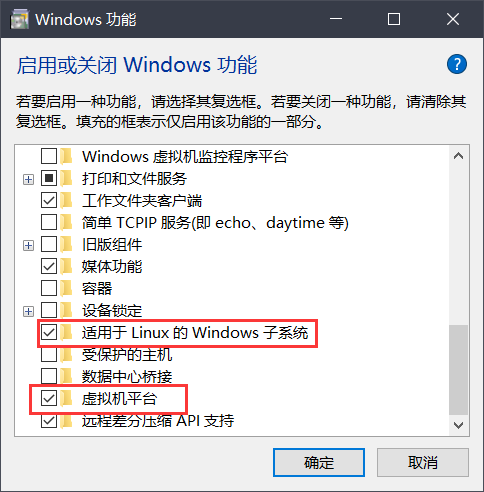
或者以管理员权限打开 PowerShell 执行以下命令后重启:
dism.exe /online /enable-feature /featurename:Microsoft-Windows-Subsystem-Linux /all /norestart dism.exe /online /enable-feature /featurename:VirtualMachinePlatform /all /norestart -
到这个页面安装 WSL 2 Linux Kernel:Updating the WSL 2 Linux kernel | Microsoft Docs。
-
设置默认 wsl 版本:
wsl --set-default-version 2 -
在 Microsoft Store 中找到想要的发行版进行安装,安装完后点击发行版图标打开,后续安装会自动进行,途中会提示新建一个 Linux 用户。
使用
换源
备份原来的配置文件:
sudo mv /etc/apt/sources.list /etc/apt/sources.list.bak
新建配置文件:
sudo vim /etc/apt/sources.list
我用的是清华镜像:
# 默认注释了源码镜像以提高 apt update 速度,如有需要可自行取消注释
deb https://mirrors.tuna.tsinghua.edu.cn/ubuntu/ bionic main restricted universe multiverse
# deb-src https://mirrors.tuna.tsinghua.edu.cn/ubuntu/ bionic main restricted universe multiverse
deb https://mirrors.tuna.tsinghua.edu.cn/ubuntu/ bionic-updates main restricted universe multiverse
# deb-src https://mirrors.tuna.tsinghua.edu.cn/ubuntu/ bionic-updates main restricted universe multiverse
deb https://mirrors.tuna.tsinghua.edu.cn/ubuntu/ bionic-backports main restricted universe multiverse
# deb-src https://mirrors.tuna.tsinghua.edu.cn/ubuntu/ bionic-backports main restricted universe multiverse
deb https://mirrors.tuna.tsinghua.edu.cn/ubuntu/ bionic-security main restricted universe multiverse
# deb-src https://mirrors.tuna.tsinghua.edu.cn/ubuntu/ bionic-security main restricted universe multiverse

# 预发布软件源,不建议启用
# deb https://mirrors.tuna.tsinghua.edu.cn/ubuntu/ bionic-proposed main restricted universe multiverse
# deb-src https://mirrors.tuna.tsinghua.edu.cn/ubuntu/ bionic-proposed main restricted universe multiverse
保存后更新:
sudo apt update; sudo apt upgrade
常用程序
WSL 1 时代有个对常用程序在 WSL 运行效果打分的项目:ethanhs/WSL-Programs,许多时候还得战战兢兢去这个页面看自己用的程序和 WSL 相性如何。
而 WSL 2 拥有完整的 Linux 内核,常见的程序应该都能运行,以下是一些我常用的程序的测试。
holo (Java + H2 数据库) 功能正常:
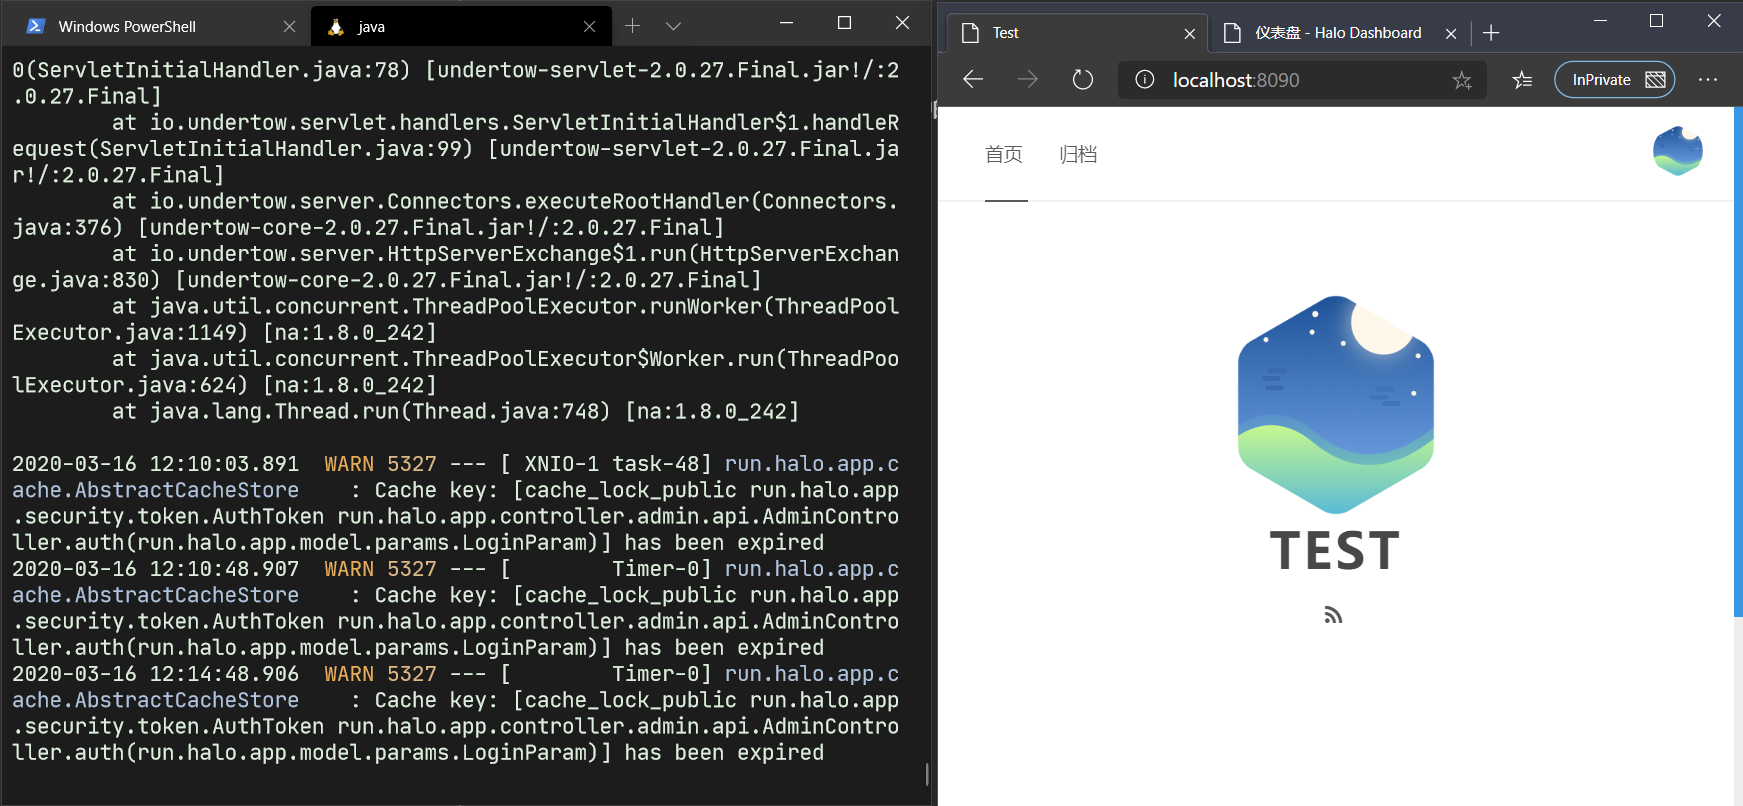
Jupyter 正常:

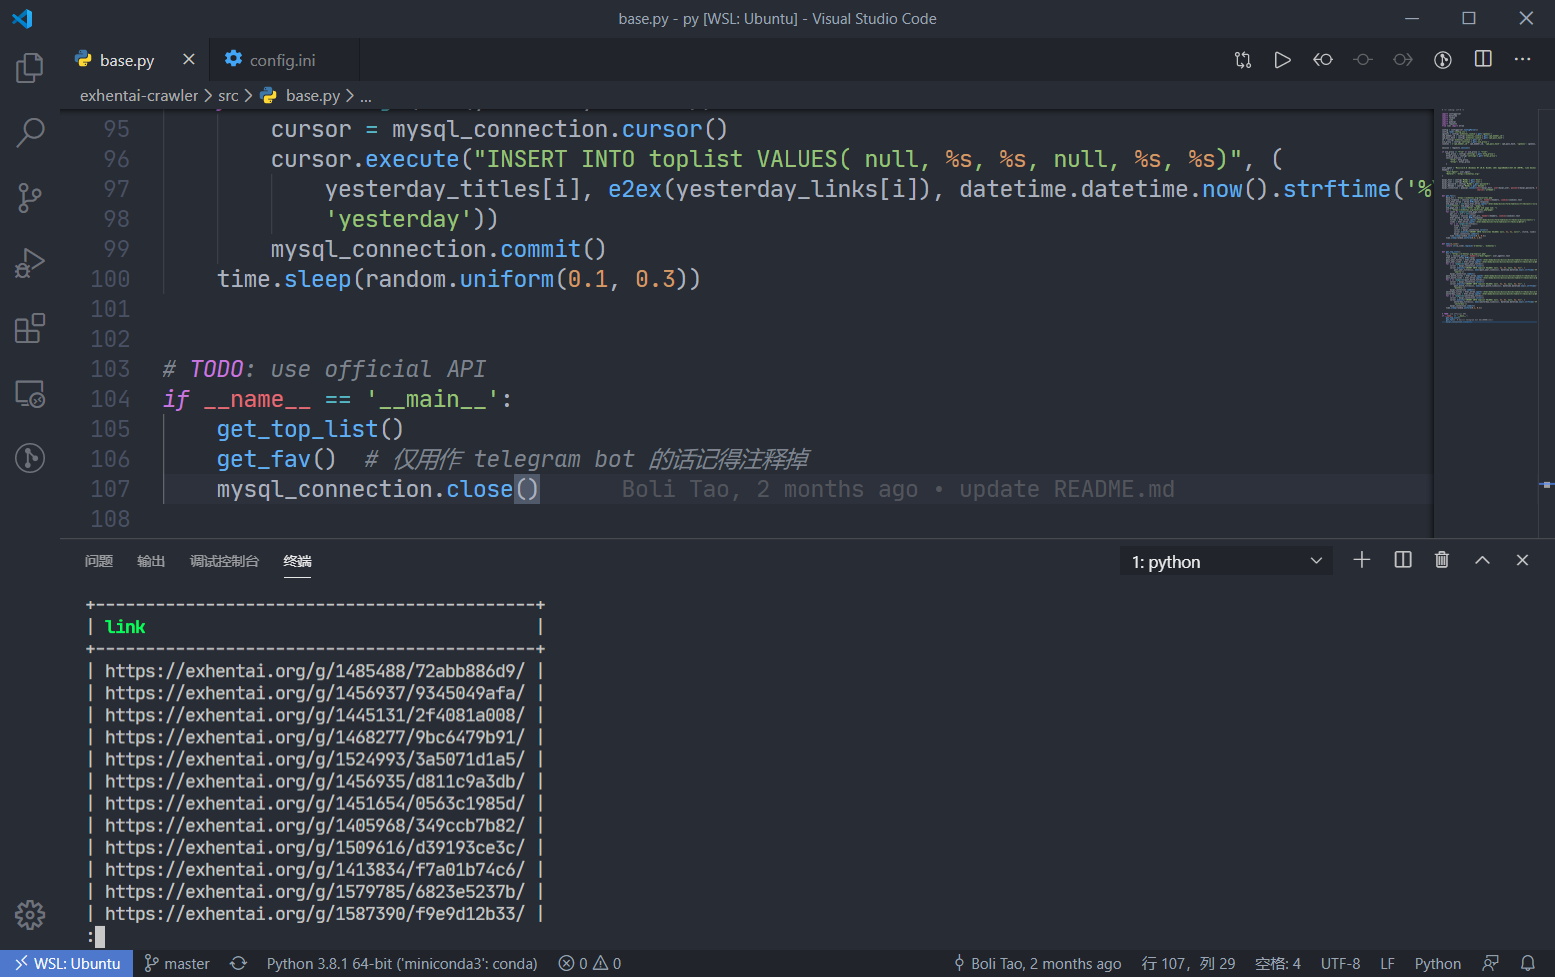
Python + MySQL 正常:NSFW 警告
注:由于 Systemctl 不可用,请使用 sudo service start mysql 来启动 MySQL。
Terminal
推荐唯一指定 Terminal——Windows Terminal,目前还处于测试,但已经足够好用。Win + Shift + 4 就可以直接打开终端了,可以在这里找到许多主题: iTerm2-Color-Schemes。
VSCode WSL 插件
现在 VSCode 插件已经兼容 WSL 2,直接在 VSCode 新建 WSL 窗口就能访问 WSL 的文件,用来写 Python 还是挺舒服的。
Shell
bash 和 ZSH 都正常运行,oh-my-zsh 也正常。
服务的互相访问
WSL 访问 Windows 服务
WSL 下可以输入 cat /etc/resolv.conf 命令查看 Windows 端 IP:
➜  ~ cat /etc/resolv.conf
# This file was automatically generated by WSL. To stop automatic generation of this file, add the following entry to /etc/wsl.conf:
# [network]
# generateResolvConf = false
nameserver 172.29.32.1
通过上面命令可知可以使用 172.29.32.1 这个 IP 访问 Windows 服务。
比如我可以在 WSL 访问 Windows 的 IP:v2ray 端口 来进行代理,详见终端代理。
Update 1:
上面通过 cat /etc/resolv.conf 获取的 IP 是会随时改变的,不过我们可以通过一个固定网址来访问 Windows 端服务:
-
新建一个 shell 脚本,命名为
changeHosts.sh# hosts edit winIp=$(cat /etc/resolv.conf | grep -oP '((2(5[0-5]|[0-4]\d))|[0-1]?\d{1,2})(\.((2(5[0-5]|[0-4]\d))|[0-1]?\d{1,2})){3}') CUSTOM_ADDRESS="win.local" addressInfo=$(cat /etc/hosts | grep -oP $CUSTOM_ADDRESS) if [ -z "$addressInfo" ]; then # if [ $EUID != 0 ]; then # sudo "$0" "$@" # exit $? # fi echo "未找到自定义地址,将会进行添加..." echo "$winIp $CUSTOM_ADDRESS" >> /etc/hosts # 申请权限 echo '完成' else customAddressLineNumber=$(grep -n "win.local" /etc/hosts | cut -d : -f 1) originalIp=$(sed -n "$customAddressLineNumber"p /etc/hosts | grep -oP '((2(5[0-5]|[0-4]\d))|[0-1]?\d{1,2})(\.((2(5[0-5]|[0-4]\d))|[0-1]?\d{1,2})){3}') # 如果 hosts 中 ip 和真实 ip 不相等,则进行更新 if [ "$winIp" != "$originalIp" ]; then echo 'hosts 中 ip 和真实 ip 不一致,进行更新...' param=$customAddressLineNumber"d" sed -i "$param" /etc/hosts echo "$winIp $CUSTOM_ADDRESS" >> /etc/hosts echo '完成' fi fi你可以将以上代码的
CUSTOM_ADDRESS设置成任何你想要的地址,比如我的就是win.local。如果不嫌每次手动运行该脚本才能更新 hosts 文件麻烦的话,就可以到此为止了。每当你重启,手动运行一遍
sudo ./changeHosts.sh就能更新 hosts 了。如果想要在每次重启后自动运行该脚本,请继续阅读。
-
使用
sudo crontab -e命令创建一个定时任务,在每次重启时执行上面创建的脚本在打开的编辑器里添加如下行,请将路径和脚本名设置成自己刚才创建的:
@reboot /path/changeHosts.sh -
使用
chmod +x /path/changeHosts.sh将脚本设置为可执行。 -
使用
sudo visudo命令,将 cron 设置为不需要 sudo 就能执行在最下面一行添加如下:
%sudo ALL=NOPASSWD: /etc/init.d/cron -
将 wsl-autostart 这个项目 clone 到 Windows 某个目录(本人是
C:\source\wsl)git clone https://github.com/troytse/wsl-autostart -
在注册表
HKEY_LOCAL_MACHINE\SOFTWARE\Microsoft\Windows\CurrentVersion\Run下创建一个字符串值数值名称随便,数值数据设置成
start.vbs所在目录: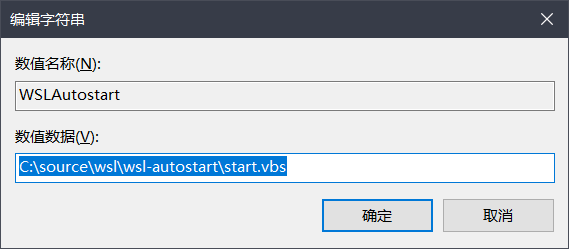
-
打开刚才 clone 目录下的
commands.txt文件,修改文件内容如下:/etc/init.d/cron
测试:在 Powershell 中输入 wsl --terminal 关闭 WSL。随后手动运行一次 start.vbs,再次启动 WSL 后可以发现能够使用 win.local 这个地址访问 Windows 的服务了:
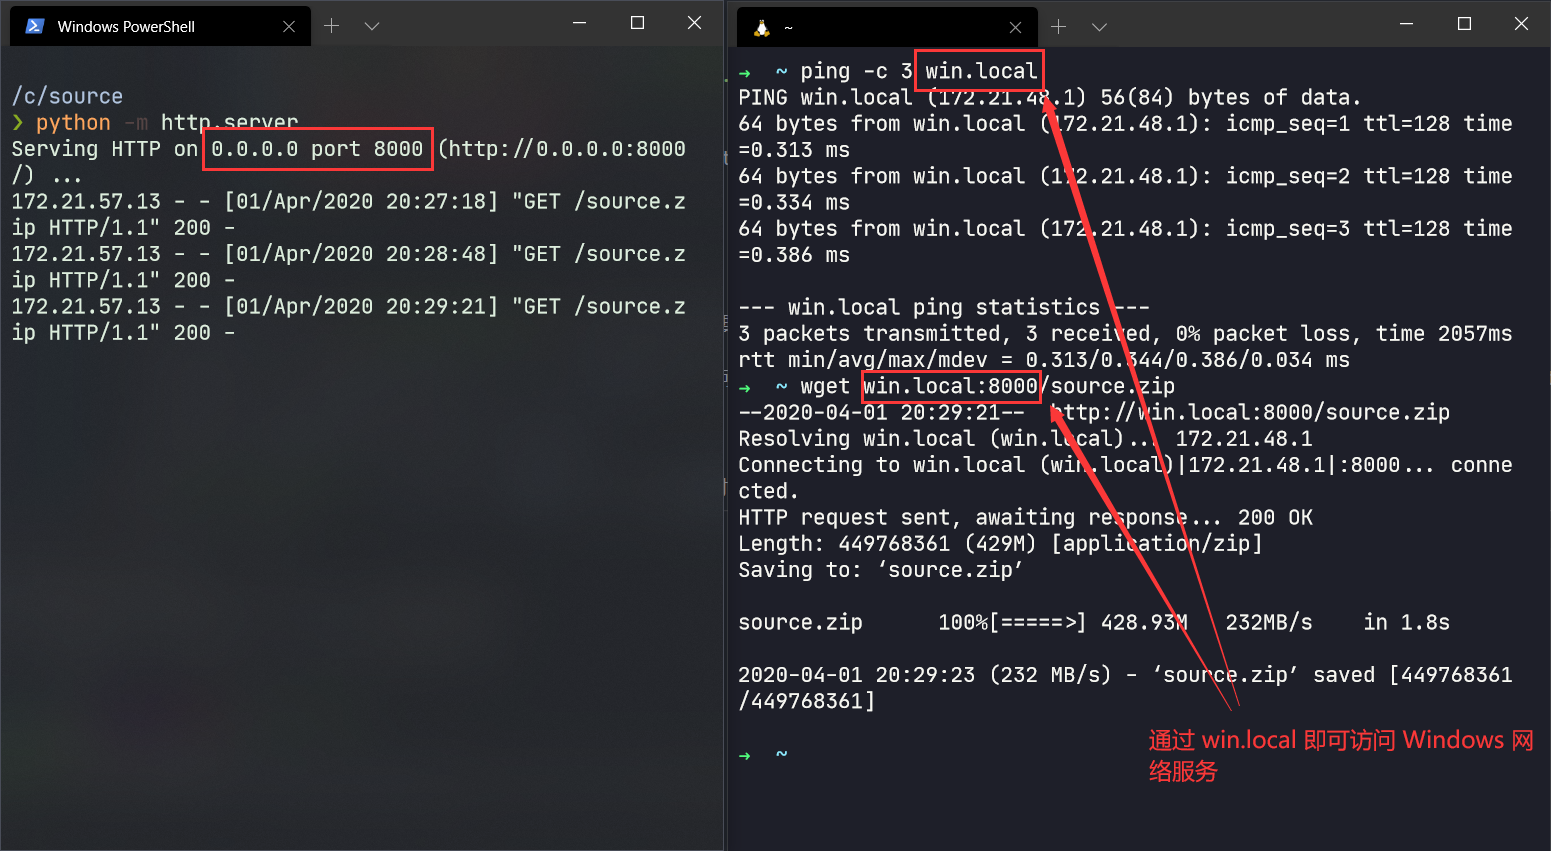
重启造成 IP 的变动也不会对我们访问 win.local 产生影响。开机后 vbs 脚本会启动 cron,随后 cron 会执行修改 hosts 的 shell 脚本,永远将 Windows 的 IP 和 win.local 这个网址绑在一起。
Update 2:
是我脑子一时短路了,路由器设置中指定机器为固定 IP,之后在 WSL2 内通过成静态 IP 即可直接访问 Windows 网络服务。
以 Padavan 为例,在 高级设置 - 内部网络 (LAN) - DHCP 服务器 - 手动指定 IP 的 DHCP 列表中可设置静态 IP:

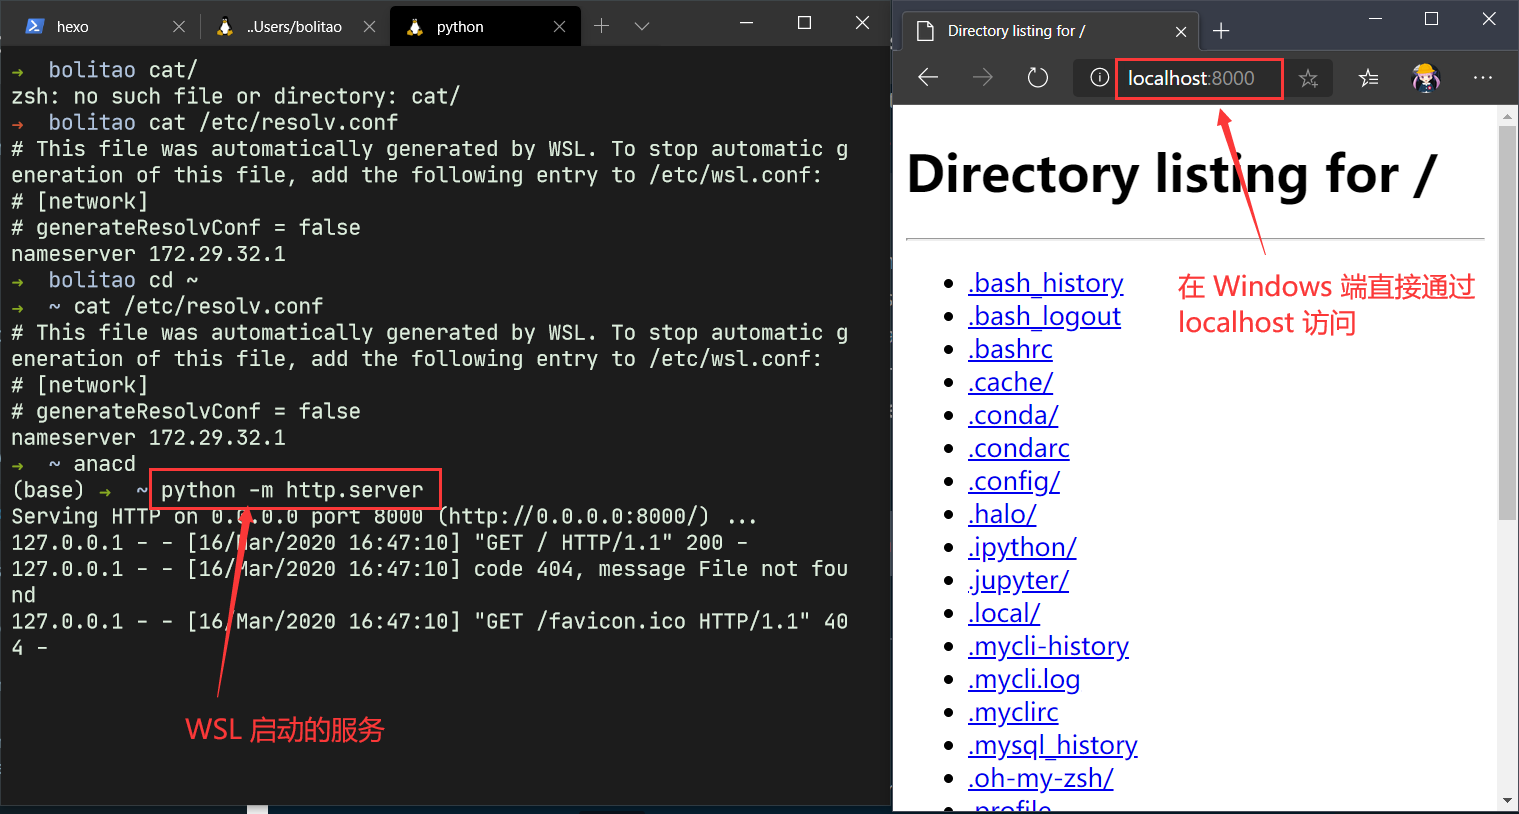
Windows 访问 WSL 网络服务
Windows 端直接使用 localhost 访问 WSL 启动的服务:
文件的互相访问
- Windows 的所有磁盘被挂载在 WSL 的
/mnt目录下。
- WSL 的文件在
\\wsl$这个地址中找到,可通过 explorer 进行访问。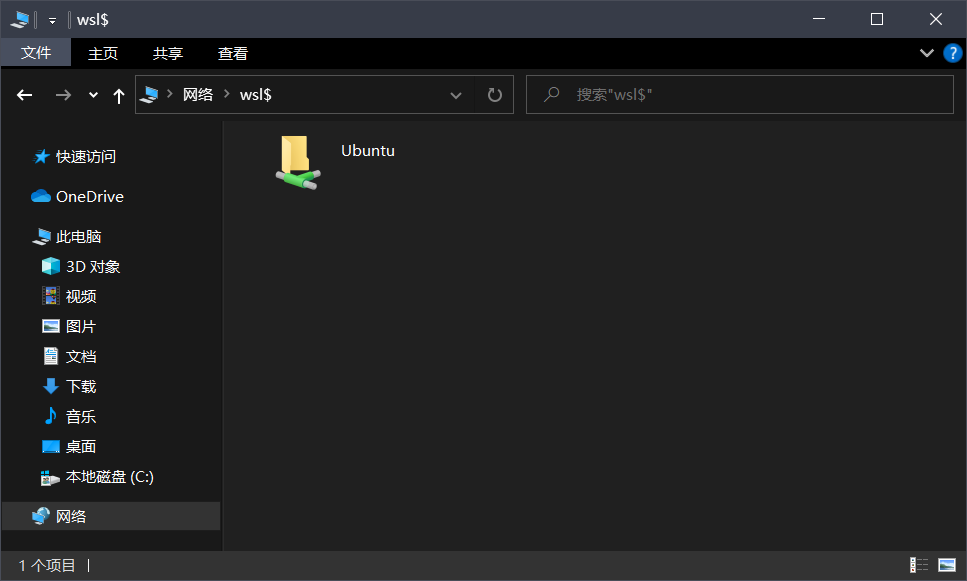
Proxy
我这里直接使用了 Windows 端的 v2ray,v2rayN 记得打开“允许来自局域网的连接”选项。zsh 配置如下(记得把 V2RAY 的值设置成自己 Windows 的 IP 和端口,或直接在 WSL 跑一个 v2ray 也是可以的):
#proxy
V2RAY='win.local:10809'
defp=$V2RAY

# No Proxy
function noproxy
{
    unset http_proxy HTTP_PROXY https_proxy HTTPS_PROXY all_proxy ALL_PROXY ftp_proxy FTP_PROXY dns_proxy DNS_PROXY JAVA_OPTS GRADLE_OPTS MAVEN_OPTS
    echo "clear proxy done"
}

function setproxy
{
	if [ $# -eq 0 ]
	then
		inArg=$defp
	else
		inArg=$1
	fi
	HOST=$(echo $inArg |cut -d: -f1)
	PORT=$(echo $inArg |cut -d: -f2)
	http_proxy=http://$HOST:$PORT
	HTTP_PROXY=$http_proxy
	all_proxy=$http_proxy
	ALL_PROXY=$http_proxy
	ftp_proxy=$http_proxy
	FTP_PROXY=$http_proxy
	dns_proxy=$http_proxy
	DNS_PROXY=$http_proxy
	https_proxy=$http_proxy
	HTTPS_PROXY=$https_proxy
	JAVA_OPTS="-Dhttp.proxyHost=$HOST -Dhttp.proxyPort=$PORT -Dhttps.proxyHost=$HOST -Dhttps.proxyPort=$PORT"
	GRADLE_OPTS="-Dgradle.user.home=$HOME/.gradle"
	MAVEN_OPTS=$JAVA_OPTS
	no_proxy="localhost,127.0.0.1,localaddress,.localdomain.com,.huaweicloud.com,.coding.net,.ruby-china.org"
	echo "current proxy is ${http_proxy}"
	export no_proxy http_proxy HTTP_PROXY https_proxy HTTPS_PROXY all_proxy ALL_PROXY ftp_proxy FTP_PROXY dns_proxy DNS_PROXY JAVA_OPTS GRADLE_OPTS MAVEN_OPTS
}
在需要使用代理时,终端输入 setproxy 即可。在想要取消时输入 noproxy。比如:
➜  ~ setproxy
current proxy is http://win.local:10809
➜  ~ curl ipinfo.io
{
  "ip": "xxx",
  "hostname": "xxx",
  "city": "Hong Kong",
  "region": "Central and Western",
  "country": "HK",
  "loc": "xxx",
  "org": "xxx",
  "timezone": "Asia/Hong_Kong",
  "readme": "https://ipinfo.io/missingauth"
}%
➜  ~ noproxy # 取消代理
clear proxy done
Docker
运行正常,我试着跑了个容器化的 TinyTinyRSS,没什么问题,爽到。

Docker Windows 版还出了一个以 WSL 2 为后端的新特性,我对以前的 Docker for Windows 有阴影,所以不尝试使用了,蹲篇对两者进行比较的文章。
GPU
无法使用 GPU,想用 WSL 跑机器学习啥的没戏,不过 MS 也说他们正慢慢迭代 WSL,敬请期待。
Systemd
无法使用,启动/停止服务要用 service。
缺陷
内存占用
内存使用显著增加,就开了个 MySQL 占用高达 3G: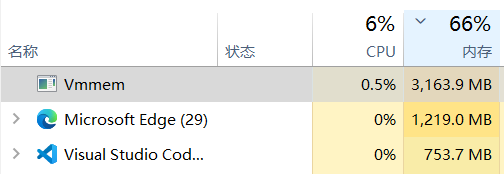
本人 16G 内存勉强能用,如果内存被 WSL 撑爆了可以尝试用 wsl --shutdown 结束所有相关服务。
预览版带来的问题
5E 对战平台不支持在预览版系统运行。
解决:老老实实等正式版推送 | 用另一台电脑打 5E
Hyper-V 带来的问题
- 腾讯家的网游和部分使用 ByttlEye 反作弊系统的游戏无法运行。
- 其他模拟器会出问题,比如 Android Studio 自带的模拟器、我玩少前用的雷电模拟器、VirtualBox等...
解决:要玩这些游戏/要用其他模拟器时临时关闭“虚拟机平台”功能(要重启,有点麻烦) | 用另一台电脑打游戏/用模拟器
对了,贴一个开启 Hyper-V 后使用 Android 模拟器的办法:使用 Hyper-V 加速 Android 模拟器 | Kara。
另外 VMware Workstation 似乎已经推出和 Hpyer-V 共存的版本,我没 license key 就不倒腾了。
总结
- WSL 2 的 I/O 表现比以往好太多,Miniconda 安装和
apt upgrade速度可能比以前快了一倍不止,我有启用 WD,不知道把 WD 换成其他防护软件 IO 表现会不会更好 - 完整的 Linux 内核很爽,Docker 终于好用了
- Systemd 还是不能用,如果要管理服务可以用
service命令
2004 更新之后新添的 WSL2 搭配 Scoop 和 Windows Terminal 还算好用,有点 macOS + iTerm2 + brew 那味,不过这也会带来娱乐性的损失——好些游戏都无法运行。